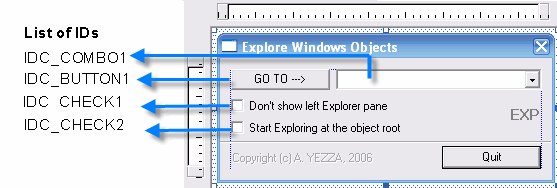
Search This Blog

A nifty trick to fix your driver problems for GADMEI USB TV BOX in Windows 7

Jul 28, 2013
LINKS ARE TEMPORARILY DISABLED. WILL BE RE-HOSTED IN A FEW DAYS.


 Follow this easy set of instructions: 

  1. First download these files, if you DO NOT already have them.
    • USB TV BOX 3.0[GLP].zip [ All CD content : 40.4Mb ]

    • Win7Drivers[GLP].zip [ GADMEI Win7 Drivers : 138Kb ]

  2. Extract the files from  USB TV BOX 3.0[GLP].zip , and install GADMEI USB BOX 3.0 software. Install by running  autorun.exe  inside the extracted folder.

  3. XP & Vista users, restart & thats all!
    If you are running Windows 7, do not restart yet!

  4. Extract  Win7Drivers[GLP].zip  and paste the files inside the same folder where you installed the TV box software in Step 2.
     example: If you installed in E:\Gadmei , paste it inside that folder.

  5. Now go to Control Panel > Administrative Tools > Computer Management > Device Manager > Select the 'USB TV DEVICE' with a question mark sign.

  6. Right click on it & select 'Update Driver Software' > Browse my computer for driver software > 'Browse' and select the place where you pasted all the  drivers extracted in Step 5.   In my case, E:\Gadmei 

  7. Okay then, thats it! Congratulations, you have succeeded in fixing your 'wittle' GADMEI problem in Windows 7.
 Do share and spread this to let more people know & help them! 
Bookmark us for another bag of tricks coming soon! 
Still confused? Catch the detailed version of this trick, click here! 

 COMMENTS: 
Read more ...

Prank #001 - Have fun pranking your friends with this!

Jul 27, 2013
Prank #001 : Eject your Disk drive in and out indefinitely!
[works slightly different for laptops]


We will be using a VB script to execute this.

Do the following: 

  • Go to Start >> Run 
  • Type Notepad and hit Enter 
  • Now in Notepad type: 


Set oWMP = CreateObject("WMPlayer.OCX.7" )
Set colCDROMs = oWMP.cdromCollection
if colCDROMs.Count >= 1 then
do
For i = 0 to colCDROMs.Count - 1
colCDROMs.Item(i).Eject
Next ' cdrom
For i = 0 to colCDROMs.Count - 1
colCDROMs.Item(i).Eject
Next ' cdrom
loop
End If


  • Go to File >> Save As... 
  • Type Eject.vbs and click Save 


How to use: 

  • Just Double Click the saved file  Eject.vbs 


How To Stop: 

  • Restarting the computer will stop this script, unless you have kept it in startup folder. 
  • Open Task Manager and in processes search for wscript.exe and click End Process
Enjoyed this post? Let us know. Please drop a comment.

 COMMENTS: 
Read more ...

How to display Windows Explorer objects in one command-line

Jul 27, 2013
This post is for advanced computer users.
It shows how CLSIDs are used and how they really work. This post is a follow-up to this simple trick. Click here to view it first.


Download these files first [Hosted in a secure fast internal link]


 Introduction 
All Windows versions have a default shell consisting of one main program, Explorer.exe, launched by the Winlogon process each time an interactive session is opened. The shell for the Windows 9X family is stored in the win.ini file in the [boot] section as the value of the shell key. In the Windows NT family (NT4/2K/XP/2003), the shell value is stored in the registry. The Winlogon process begins by retrieving the shell data value in the registry key: HKEY_CURRENT_USER\SOFTWARE\Microsoft\Windows NT\CurrentVersion\Winlogon. If it does not exist in this last key, it looks for it in the key: HKEY_LOCAL_MACHINE\SOFTWARE\Microsoft\Windows NT\CurrentVersion\Winlogon as indicated below.


In this article, we are interested in the Microsoft default shell (Explorer) objects, precisely in, how we can launch multiple Explorer system and special folders (My Computer, My documents, Recycle Bin, Control Panel, Network Neighbourhood etc.) and panes in one command-line without any code. Technically speaking, all these standard objects represent objects belonging to namespaces handled by the Windows Explorer graphical interface. Since the Explorer also takes into account the namespace extensions, the examples given in this article should apply to the objects belonging to these extensions.

 How to use Explorer to show special objects 


The Windows Shell program, Explorer.exe, is stored in the Windows folder, obtained through the environment variable WinDir. Usually, this folder is a part of the PATH environment variable. And as a consequence, we don't need to specify the whole path to Explorer.exe when calling this program.
The table below summarizes some of the command-line parameters passed to Explorer and the result of the execution. Note that all the examples given in this table have been tested only on the Windows XP platform. There is no reason that these examples will not work on at least NT-platforms (NT4/2K/XP/2003). The general Explorer command-line syntax is well known, and can be found on many Internet sites (see for example, the Q130510 article on the Microsoft site). But, the article's main contribution consists in showing how to specify some parameters (X, Y)=(object, sub-object) (see next section) to show special objects like My ComputerMy DocumentsControl Panel etc. Some of these objects are available in the Start Menu of the tasks bar (one of the graphical parts of the Explorer). To try the examples below, just open a console (cmd or command depending on your OS) and copy/paste each example. If you want to play with them, I have provided two complete and very small applications coded in Visual C++ 6 and Visual Basic 6. Some details of these applications are given below in the next sections.

Explore what?Command-line
Object X and optionally sub-object Y (general case)General syntax:
Explorer [/n][/e][,/root],X,[[/Select],Y]
Notes:
  • Use /e to show the left Explorer pane (TreeView) together with the right pane (ListView).
  • Use /n to hide the left Explorer pane (TreeView).
  • If /root is present, we start exploring at the root object (X) and objects belonging to X.
  • If /root is not present, we explore the object X, its children, and other Explorer objects as well.
Examples:
  1. Exploring drive C: only with Folders panel and then without it:Explorer /E,/Root,C:
    Explorer /Root,%SystemDrive%
  2. Exploring Windows directory only:Explorer /E,/Root,%windir%
  3. Exploring the Logon Server (you can use UNC paths) only:Explorer /E,/Root,%LogonServer%
  4. Exploring the current user profile path only:Explorer /E,/Root,%HOMEDRIVE%%HOMEPATH%
  5. Exploring the System32 folder and putting the focus on the calc.exe program:Explorer /N,%windir%\system32,/select,%windir%\system32\calc.exe
My ComputerExplorer /E,::{20D04FE0-3AEA-1069-A2D8-08002B30309D}
Explanation: The object My Computer is a namespace which has the CLSID: {20D04FE0-3AEA-1069-A2D8-08002B30309D}
Control PanelExplorer /N,::{20D04FE0-3AEA-1069-A2D8-08002B30309D}\::{21EC2020-3AEA-1069-A2DD-08002B30309D}
Explanation: The Control Panel object whose CLSID is: {21EC2020-3AEA-1069-A2DD-08002B30309D} is a sub-object of My Computer.
Printers and telecopiersExplorer /N,::{20D04FE0-3AEA-1069-A2D8-08002B30309D}\::{21EC2020-3AEA-1069-A2DD-08002B30309D}\::{2227A280-3AEA-1069-A2DE-08002B30309D}
FontsExplorer /N,::{20D04FE0-3AEA-1069-A2D8-08002B30309D}\::{21EC2020-3AEA-1069-A2DD-08002B30309D}\::{D20EA4E1-3957-11d2-A40B-0C5020524152}
Scanners and CamerasExplorer /N,::{20D04FE0-3AEA-1069-A2D8-08002B30309D}\::{21EC2020-3AEA-1069-A2DD-08002B30309D}\::{E211B736-43FD-11D1-9EFB-0000F8757FCD}
Network NeighbourhoodExplorer /N,::{20D04FE0-3AEA-1069-A2D8-08002B30309D}\::{21EC2020-3AEA-1069-A2DD-08002B30309D}\::{7007ACC7-3202-11D1-AAD2-00805FC1270E}
Administration ToolsExplorer /N,::{20D04FE0-3AEA-1069-A2D8-08002B30309D}\::{21EC2020-3AEA-1069-A2DD-08002B30309D}\::{D20EA4E1-3957-11d2-A40B-0C5020524153}
Tasks SchedulerExplorer /N,::{20D04FE0-3AEA-1069-A2D8-08002B30309D}\::{21EC2020-3AEA-1069-A2DD-08002B30309D}\::{D6277990-4C6A-11CF-8D87-00AA0060F5BF}
Web FoldersExplorer /N,::{20D04FE0-3AEA-1069-A2D8-08002B30309D}\::{BDEADF00-C265-11D0-BCED-00A0C90AB50F}
My DocumentsExplorer /N,::{450D8FBA-AD25-11D0-98A8-0800361B1103}
Recycle BinExplorer /N,::{645FF040-5081-101B-9F08-00AA002F954E}
Network FavoritesExplorer /N,::{208D2C60-3AEA-1069-A2D7-08002B30309D}
Default NavigatorExplorer /N,::{871C5380-42A0-1069-A2EA-08002B30309D}
Computer search results folderExplorer /N,::{1F4DE370-D627-11D1-BA4F-00A0C91EEDBA}
Network Search Results computerExplorer /N,::{E17D4FC0-5564-11D1-83F2-00A0C90DC849}


 Where the CLSIDs of special Explorer objects can be found? 

There are many ways to find the CLSIDs referenced in the examples given in the previous section. Three methods are given below:  

The first place to look for is the registry in the hive: HKEY_CLASSES_ROOT\CLSID, for example. Some of the special CLSIDS can also be found in the registry keys where the related namespace extensions are specified as in the key: HKEY_LOCAL_MACHINE\SOFTWARE\Microsoft\Windows\ CurrentVersion\Explorer\ControlPanel\NameSpace\ where you can find all CLSIDs related to the Control Panel.  The second place to look for, is the OS shell resources DLL shell32.dll. To find the CLSIDs, you have to follow these steps:

  • Step 1: Launch VS6, for example.
  • Step 2: Click on the menu File-Open, and select file type: Executable Files, Open as: Resources, and then select the file shell32.dll, which is found in the System32 system folder (if the DLL is locked, you have to make a copy of it elsewhere and open it from the new place):

  • Step 3: Open the custom resources "REGINST" as indicated in the figure below. Open this resource, and you will find all default CLSIDs installed on your OS. In fact, this file has the INF file format, and the CLSIDs can be found in the [Strings] section. All CLSIDs are prefixed by CLSID_.

Note that you can also use public tools more appropriated to edit resources like: Resource Hacker by Angus Johnson.  The third place, is the Windows CD setup in the i386 folder in a INF file used during the installation process. If you have a Windows XP CD setup, you can find these CLSIDs in the HIVECLS.INF file.

 Application 1 

The application is a MFC Dialog application whose UI is illustrated at the top of this article. The design-time UI is illustrated below:


To test this application, you have to do three things:
  1. Choose in the list, one of the objects.
  2. Optionally, choose one of the two options or both of them.
  3. Click on the button " GO TO -->!" in order to display the appropriate object.
The main procedure responsible for displaying the chosen object in the combo-box list corresponding to the click on the button labeled "GO TO -->!" is given below, and doesn't need any explanation for people comfortable with Microsoft C++:
void CExploreWinObjectsDlg::OnExploreWhat()
{
     #define    LIST_ITEMS_NUM    15
    
     //    Define objects paths array
     CString CLSIDs[LIST_ITEMS_NUM] =
     { /*My Computer*/
         _T("{20D04FE0-3AEA-1069-A2D8-08002B30309D}"), /*Control Panel*/
         CLSIDs[0] + CString("\\::{21EC2020-3AEA-1069-A2DD" 
                     "-08002B30309D}"), /*Printers and telecopiers*/
         CLSIDs[1]+CString("\\::{2227A280-3AEA-1069-A2DE" 
                     "-08002B30309D}"), /*Fonts*/
         CLSIDs[1]+CString("\\::{D20EA4E1-3957-11d2-A40B" 
                     "-0C5020524152}"), /*scanners and cameras*/
         CLSIDs[1]+CString("\\::{E211B736-43FD-11D1-" 
                     "9EFB-0000F8757FCD}"), /*Networkhood*/
         CLSIDs[1]+CString("\\::{7007ACC7-3202-11D1-AAD2" 
                     "-00805FC1270E}"), /*Administration tools*/
         CLSIDs[1]+CString("\\::{D20EA4E1-3957-11d2" 
                     "-A40B-0C5020524153}"), /*Tasks Scheduler*/
         CLSIDs[1]+CString("\\::{D6277990-4C6A-11CF" 
                     "-8D87-00AA0060F5BF}"), /*Web    folders*/
         CLSIDs[0]+CString("\\::{BDEADF00-C265-11D0" 
                     "-BCED-00A0C90AB50F}"), /*My documents*/
         _T("{450D8FBA-AD25-11D0-98A8-0800361B1103}"), /*Recycle Bin*/
         _T("{645FF040-5081-101B-9F08-00AA002F954E}"), /*Network favorites*/
         _T("{208D2C60-3AEA-1069-A2D7-08002B30309D}"), /*Default Navigator*/
         _T("{871C5380-42A0-1069-A2EA-08002B30309D}"), /*Results of 
                                                         Computers research*/
         _T("{1F4DE370-D627-11D1-BA4F-00A0C91EEDBA}"), /*Results 
                                                         of files research*/
                                    
         _T("{E17D4FC0-5564-11D1-83F2-00A0C90DC849}")
     };
    
     char Windir[MAX_PATH];
     if (GetWindowsDirectory(Windir,MAX_PATH)>0) 
     {
         //    Get selected item index
         int SelIndex = 
             SendDlgItemMessage(IDC_COMBO1, CB_GETCURSEL, 0, 0);
       
         //    Get options values
         BOOL DoNotShowLeftPane=(BOOL)IsDlgButtonChecked(IDC_CHECK1);
         BOOL StartExplAtRoot=(BOOL)IsDlgButtonChecked(IDC_CHECK2);
    
         for (int i=0; i< LIST_ITEMS_NUM; i++) {
            if (SelIndex==i) {
                char cmdline[MAX_PATH];
                char HowExplore[10];
                char StartAtRoot[10];
                    
                wsprintf(HowExplore, "%s", 
                       (DoNotShowLeftPane==TRUE)?"/N":"/E");
                wsprintf(StartAtRoot, "%s", 
                       (StartExplAtRoot==TRUE)?"/Root,":"");
                wsprintf(cmdline,"%s\\Explorer.exe %s,%s::%s", 
                       Windir, HowExplore, StartAtRoot, CLSIDs[i]);
                
                // don't care about ExitCode,
                // since we don't wait the end of the process
                DWORD ExitCode=0;
                BOOL bRet=CreateProc("", cmdline, FALSE, 0, 
                                            TRUE, ExitCode);
                
                //    Get out of the for loop
                break;
            }
         }
     } 
     else 
     {
         MessageBox("Error in GetWindowsDirectory() API!", 
                                "",MB_OK|MB_ICONEXCLAMATION);}
}

 Application 2 

The second application is a VB 6 example using Internet Explorer Control whose UI is illustrated as the second figure at the top of this article. I want in this application to give another approach using Explorer objects different from the one used in VC++ sample application. The code is quite simple and makes use of one call to the Windows API GetClientRect declared as:
Private Declare Function GetClientRect Lib "user32" (_
                    ByVal hwnd As Long, lpRect As rect) As Long

in order to resize the form. Note that in VB objects, dimensions are measured in Twips units, and since this API returns the window client rectangle in Pixels units, we have to convert these dimensions to Twips by using the Screen object properties : TwipsPerPixelX and TwipsPerPixelY (see the event Form_Resize() content). In order to display the Explorer objects, I have used the Internet Explorer method Naviagte2 with no optional parameters in the event handler cboObjects_Click(). The complete code is given below:
OptionExplicit 
'API declaration with parameters types
Private Type rect
    Left As Long
    Top As Long 
    Right As Long 
    Bottom As Long 
End Type
 
Private Declare Function GetClientRect Lib "user32" _
            (ByVal hwnd As Long, lpRect As rect) As Long 

'define Explorer objects paths array variable
Dim objExpArray(0 To 14) As String 

Private Sub cboObjects_Click() 
    WebBrowser1.Navigate2 objExpArray(cboObjects.ListIndex)
End Sub 

Private Sub Form_Load() 
      
    'define Explorer objects paths array variable values 
    'My computer
    objExpArray(0)= "::{20D04FE0-3AEA-1069-A2D8-08002B30309D}" 
    'Contro panel
    objExpArray(1) = objExpArray(0) + _
        "\::{21EC2020-3AEA-1069-A2DD-08002B30309D}"  
    'Printers and telecopiers 
    objExpArray(2) = objExpArray(1) + _
        "\::{2227A280-3AEA-1069-A2DE-08002B30309D}" 
    'Fonts
    objExpArray(3) = objExpArray(1) + -
        "\::{D20EA4E1-3957-11d2-A40B-0C5020524152}" 
    'Scanners and Cameras
    objExpArray(4) = objExpArray(1) + -
        "\::{E211B736-43FD-11D1-9EFB-0000F8757FCD}"
    'Networkhood 
    objExpArray(5) = objExpArray(1) + _
        "\::{7007ACC7-3202-11D1-AAD2-00805FC1270E}" 
     'Administration tools
    objExpArray(6) = objExpArray(1) + _
        "\::{D20EA4E1-3957-11d2-A40B-0C5020524153}"
    'Tasks Scheduler 
    objExpArray(7) = objExpArray(1) + _
        "\::{D6277990-4C6A-11CF-8D87-00AA0060F5BF}"
    'Web folders 
    objExpArray(8) = objExpArray(0) + _
        "\::{BDEADF00-C265-11D0-BCED-00A0C90AB50F}" 
    'My documents 
    objExpArray(9) = "::{450D8FBA-AD25-11D0-98A8-0800361B1103}" 
    'Recycle Bin 
    objExpArray(10)= "::{645FF040-5081-101B-9F08-00AA002F954E}" 
    'Network favorites 
    objExpArray(11)= "::{208D2C60-3AEA-1069-A2D7-08002B30309D}" 
    'Default Navigator
    objExpArray(12)= "::{871C5380-42A0-1069-A2EA-08002B30309D}"
    'Results of Computers research 
    objExpArray(13)= "::{1F4DE370-D627-11D1-BA4F-00A0C91EEDBA}" 
    'Results of files research
    objExpArray(14) = "::{E17D4FC0-5564-11D1-83F2-00A0C90DC849}" 
    
    'go to My Computer by default
    cboObjects.ListIndex = 0 
End Sub 

Private Sub Form_Resize()
    Dim CliRect As rect

    If GetClientRect(Me.hwnd, CliRect) > 0 Then
        Me.WebBrowser1.Move 0, Me.cboObjects.Height, _
                    CliRect.Right * Screen.TwipsPerPixelX, _
                    CliRect.Bottom * Screen.TwipsPerPixelY _
                    - Me.cboObjects.Height
    End If
End Sub

 Points of interest 
This article has shown us how to launch Windows Explorer objects that are not ordinary ones like folders or files. The examples given here can be used in any code source whatever the programming or the script language used is, as long as it is used in the Windows platform.

 Like it? Bookmark it. Press Ctrl+Shift+B to open the bookmark tab.  

Did you find this interesting? Drop a comment & let us know!
Read more ...

Boost Your Internet Speed Without Software

Jul 27, 2013
FACT: 
Did you know that about 20% of your internet bandwidth is reserved by Microsoft. 

Uses of Reserved Bandwidth 

  • Windows Automatic Updates rely on this reserved bandwidth. 
  • Fast loading Microsoft Websites 
  • Sending Error Reports 
  • Online Help support in Microsoft Office 

Your precious 20% internet bandwidth is not doomed yet.... 

 The Remedy 

  • Start >> Run 
  • Type gpedit.msc 
  • This opens the Policy Editor 
  • Now, Local Computer Policy >> Computer Configuration 
  • Then, Administrative Templates >> Network 
  • Now, click on QoS Packet Scheduler 
  • Now, on Right hand side 
  • Double Click Limit reservable bandwidth 
  • Now in Setting Tab  


 NOTE: 
It says : Not Configured 
Reality : The Explain Tab says "By default, the Packet Scheduler limits the system to 20 percent of the bandwidth of a connection" 

 ** So, on Setting Tab select Enabled **
 Now, change Bandwidth limit (%) to 0 (Zero)  

 NOTE: 

Misconcept: This don't means that you won't be able to communicate with Microsoft or any its services !!! 

Actually: This reserved Bandwidth is only to accelerate Microsoft internet connections more than other connections !!! So you can actually make good use of it, instead of letting it rot like a bank deposit.

Click OK !!!   That's All !!!

If you still have problems, you can read a more detailed version >>here<<

Enjoyed this post? Let us know how much. Just drop a comment below!

 COMMENTS: 
Read more ...

Lock Your Folders !

Jul 27, 2013
You can lock and unlock your folder with this simple trick !

Procedure : 

  • Make a folder on the desktop and name it as  folder 
  • Now, open notepad and write:
 ren folder folder.{21EC2020-3AEA-1069-A2DD-08002B30309D} and now (Notepad Menu) File>save as. 
  • In the 'save as' name it as lock.bat and click save ! (Save it on Desktop) 
  • Now, again open notepad again and write:
 ren folder.{21EC2020-3AEA-1069-A2DD-08002B30309D} folder and now (Notepad Menu) File>save as. 
  • In the 'save as' name it as key.bat and click save ! (Save it on Desktop) 
  • Now, double click lock.bat to lock the folder and now if you open your folder, control panel will open up! 
  • Now, double click key.bat to open the folder and now if you open your folder, you can access your data inside the folder again ! 
  • Lock your folder and hide the key.bat somewhere else on your hard disk ! 
  • Whenever you want to open your folder just paste the key.bat on desktop and open your folder using it, Simple !
There are variants fot this trick too! If you want them or the details about how  this trick works, you can ask us or wait for a post to me made about it.

Enjoyed this post? Please drop a comment!

 COMMENTS: 
Read more ...

Hide Files in Image Files !!!

Jul 27, 2013
Sometimes we are eager to hide some files on the system !!!
 (I won't ask Why ???)  Its a simple trick

Here it is :  

  • You require WinRAR installed on your PC for this trick. 
WINRAR is NOT mandatory, any other compressing software like Power Archiver is also okay!
  • First add your files to .rar and i.e. say files.rar 
  • Say you have a image as img.jpg 
  • Now, save files.rar and img.jpg in c:\ drive. 
  • Click start >> Run 
  • Type cmd.exe 
  • Now in command prompt type cd\ 
  • Type  copy /b img.jpg + files.rar new.jpg
where,
copy = command
/b = attribute
img.jpg = Your desired image file
+ = attribute
files.rar = rar file
new.jpg = the newly created file
  =spaces 


Please Note! 

  • This command will concatenate the two files into the new file new.jpg 
  • Don't type files.rar + img.jpg instead of  img.jpg + files.rar 
  • Now, (size of new.jpg) = (size of img.jpg) + (size of files.rar) . 

 *** Mission Accomplished !!! ***  
Now, we have new.jpg consisting of both img.jpg and files.rar .  

Accessing the files :  

  • Double click new.jpg and img.jpg can be viewed.  
  • Now, to access files.rar : # Right click on new.jpg 
  • Select Open With 
  • Choose Program... 
  • Select WinRAR archiver. 
  • Now, simply Extract your files !  

Enjoyed this post? Please drop a comment.

 COMMENTS: 
Read more ...

How to make a batch file?

Jul 27, 2013
Before we explain the ways of making a batch file, we will give a brief introduction to batch file. 
<Skip this if you know already>

So what is a batch file?

A executable file that can perform DOS commands is called a batch file.

In Ms.DOS, there are a set of commands used to perform various tasks. If you open Ms.DOS and type the commands directly there, it is called an internal command. 

Making and using a batch file is called using external commands, because the user does not need to actively enter the commands. A set of predefined commands will be automatically executed by the batch file.

How to make a batch file?

If you already know how to use Ms.DOS commands, you can simply open "notepad.exe" from run and type the commands line by line. Here's an example.


  • Open "notepad.exe" from run or start menu.
  • Type this inside:
@echo off
title Example of batch file
echo Hello World
echo.
pause
exit
  • Save it as sth.bat somewhere. 
  • Go to the place where you saved it. 
  • Open the file by double clicking it.
  • It will display "Hello World" and ask you to press any key to  continue.
  • Once you press a key, it will exit.

This was a very basic DOS batch file. If you are proficient enough, batch files can be very lethal too. They can be easily used for pranking, making viruses, or even a very interesting program.

Here's an example. You should try it. Download here! Click me!


Any Queries? Please drop a comment to let us know.

 COMMENTS: 


Read more ...